Monday, 31 December 2018

9 Reasons for Leaving Your Last Job That Hiring Managers Will Completely Understand

Out of all the questions hiring managers can potentially ask you during an interview, “Why did you leave your last job?” could be one of the hardest to answer.

To effectively answer this question, you need to frame your response in a way that shows hiring managers that you know what's important to you and how to handle less than ideal situations. But you also don’t want to sound ungrateful for the opportunities you had in your previous role, or come off like you're still bitter about how you left things with your last employer.

Click here to unlock a free guide and template designed to help you create a company culture code. 

It can be challenging to explain why you decided to leave your last position without throwing your old company under the bus. But if answered thoughtfully, this question can help you highlight your flexibility and self-awareness.

To help you nail this question at your next interview, we rounded up nine reasons for leaving your last job that hiring managers will completely understand. And even if you’ve only worked in your current role for a short amount of time, these reasons can help you frame your decision to depart your last role in a way your potential new employer can truly respect.

1. You’re looking to level up in your career, and your current company has limited opportunities for career growth.

Career stagnation can be incredibly frustrating. If you’ve worked hard at the same company for a few years, and you haven’t been promoted or even promised a promotion, you have every right to leave your current job. If you can communicate that you haven’t been able to climb the career ladder at your preferred pace during your interview, you’ll show hiring managers that you’re ambitious and goal-orientated.

2. You don’t feel challenged or fulfilled at your current job.

No job is perfect, but if you don’t feel any satisfaction at work, it’s definitely time for a change. Work becomes a chore if you don’t feel mentally stimulated or emotionally fulfilled. And hiring managers will completely understand why you’re leaving your current role, if this is the case. They’ll also be impressed with your internal need to be passionate about your job.

3. The nature of your work is not what was promised to you.

Did your current employer promise you a copywriting job, but now you somehow work in product marketing? If they’ve baited-and-switched you like this, wanting to leave the company is more than understandable. They promised you something, but failed to honor it -- so why stay?

Leaving your job to find a new role that actually meets your expectations will also show hiring managers that you can stand up for yourself and pursue what you truly want in life.

4. You’re burnt out.

If your job’s heavy workload or endless stress make you hate going to work, it’s time for a fresh start somewhere else. Burnout can make work and, in turn, life miserable and most hiring managers have experienced it at least once in their careers, so if you need a new change of pace, they’ll definitely be able to empathize with you. They’ll also respect your willingness to take care of your mental and emotional health.

5. You feel undervalued at your current job.

When your current manager underestimates your potential or doesn’t know how to leverage your skill set to its full potential, work can become frustrating and dull. So why work for a company that doesn’t challenge you or allow you to make a impact?

If you can genuinely convey these frustrations and aspirations during your interview, hiring managers will perceive you as someone who truly wants to make a difference at their company -- and that’ll only boost your chances of landing the job.

6. You want to make a career change.

In a world where most industries never stop changing, it’s common to leave a job to pursue a new career path. But even if you think your lack of experience in an industry is a vulnerability, you shouldn’t fret. Most hiring managers actually like hiring candidates from other industries because they can bring a fresh perspective to their team and company.

7. You want a better work life balance.

Sometimes employers forget that people work to live and don’t live to work. If your current job steals too many hours away from your personal life, it’s time to go. Life is for living, so if you can express your desire to work in a new role that provides a better work life balance, hiring managers will admire the respect you have for your own time.

8. Your values don’t align with the company’s values.

Whether you were never a good fit at your current company or a merger or acquisition altered its values, a moral conflict with an employer is totally a justifiable reason to leave. If you stand firmly behind your own beliefs, you shouldn’t have to compromise your ethics to drive results for a business you don’t support.

Hiring managers also want to hire people whose values align with their company’s, so clarifying that you both have similar principles will help you out tremendously during an interview.

9. You had to leave the company due to family or personal reasons.

Life happens. If you left your last job because you needed to take care of your family or nourish your physical or mental health, hiring managers won’t knock off any points during your interview. In fact, this reason will most likely bump up your score because you’ve proved that you can prioritize what’s truly important in life.

download free guide to company culture


from Marketing https://blog.hubspot.com/marketing/reasons-leaving-last-job

What Does Allyship Mean?

Research has shown more inclusive companies have a 2.3x higher cash flow per employee, and are 1.7 times more likely to be innovation leaders in their industry.

Increasing sales, while driving innovation -- who doesn't want that?

Undoubtedly, inclusion is critical for your company's success and long-term growth. But inclusion can't happen without allyship -- and yet, many of us still aren't sure what "allyship" means.

I have a sticker on my laptop that reads, "Ally is a verb". I got it recently at an Allyship panel hosted here at HubSpot. It's a daily reminder for me that being an ally is continuous action -- not just a label.

To ensure a workplace culture in which employees feel included and valued, it's critical you learn what allyship means, and how you can become an ally.

Click here to unlock a free guide and template designed to help you create a company culture code. 

What Does Allyship Mean?

Allyship is the continuous process in which someone with privilege and power seeks to first learn about the experiences of a marginalized group of people, and then ultimately empathize with their challenges and build relationships with that group of people.

The role of an ally includes:

  • Being able to listen, and shine a spotlight on those whose voices are often unheard.
  • Recognizing your own privilege and power, and using that privilege to lift others up.
  • Being aware of implicit biases you might have.
  • Supporting the group you're allying by letting them speak for themselves whenever possible.
  • Not expecting special recognition for being an ally, and not taking credit for the ideas of the marginalized group.

Additionally, Corey Ponder, who published How To Challenge Ourselves to Grow As Allies on Medium, writes, "Allies recognize their privilege and status within the in-crowd but support others that are outsiders or lack a voice in the in-crowd. This requires challenging accepted group dynamics and recognizing that being part of the in-crowd should not supersede the importance of supporting individuals that are outsiders or that lack a voice in the in-crowd."

Ultimately, it's critical you remember being an ally is not a part-time role.

For a complete list of resources on allyship, check out How to Be an Ally: 23 Resources That Can Help.

download free guide to company culture

from Marketing https://blog.hubspot.com/marketing/allyship

Sunday, 30 December 2018

How to Do A/B Testing: A Checklist You'll Want to Bookmark

When marketers like us create landing pages, write email copy, or design call-to-action buttons, it can be tempting to use our intuition to predict what will make people click and convert.

But basing marketing decisions off of a "feeling" can be pretty detrimental to results. Rather than relying on guesses or assumptions to make these decisions, you're much better off running an A/B test -- sometimes called a split test.

A/B testing can be valuable because different audiences behave, well, differently. Something that works for one company may not necessarily work for another. In fact, conversion rate optimization (CRO) experts hate the term "best practices" because it may not actually be the best practice for you.

Learn how to run effective A/B experimentation in 2018 here.

But A/B tests can also be complex. If you're not careful, you could make incorrect assumptions about what people like and what makes them click -- decisions that could easily misinform other parts of your strategy.

Keep reading to learn how to do A/B testing before, during, and after data collection so you can make the best decisions from your results.

To run an A/B test, you need to create two different versions of one piece of content, with changes to a single variable. Then, you'll show these two versions to two similarly sized audiences and analyze which one performed better over a specific period of time (long enough to make accurate conclusions about your results).
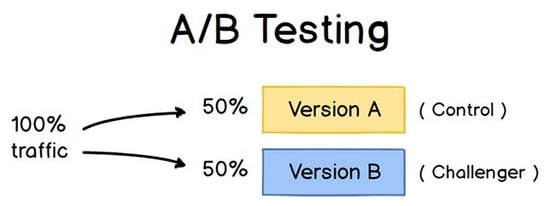
Explanation of what a/b testing is

Image Credit: ConversionXL

A/B testing helps marketers observe how one version of a piece of marketing content performs alongside another. Here are two types of A/B tests you might conduct in an effort to increase your website's conversion rate: 

Example 1: User Experience Test

Perhaps you want to see if moving a certain call-to-action (CTA) button to the top of your homepage instead of keeping it in the sidebar will improve its clickthrough rate.

To A/B test this theory, you'd create another, alternative web page that reflected that CTA placement change. The existing design -- or the "control" -- is Version A. Version B is the "challenger." Then, you'd test these two versions by showing each of them to a predetermined percentage of site visitors. Ideally, the percentage of visitors seeing either version is the same.

Learn how to easily A/B test a component of your website with HubSpot's Marketing Hub.

Example 2: Design Test

Perhaps you want to find out if changing the color of your call-to-action (CTA) button can increase its clickthrough rate.

To A/B test this theory, you'd design an alternative CTA button with a different button color that leads to the same landing page as the control. If you usually use a red call-to-action button in your marketing content, and the green variation receives more clicks after your A/B test, this could merit changing the default color of your call-to-action buttons to green from now on.

To learn more about A/B testing, download our free introductory guide here.

The Benefits of A/B Testing

A/B testing has a multitude of benefits to a marketing team, depending on what it is you decide to test. Above all, though, these tests are valuable to a business because they're low in cost but high in reward.

Let's say you employ a content creator for $50,000/year. This content creator publishes five articles per week for the company blog, making 260 articles per year. If the average post on the company's blog generates 10 leads, you could say it costs just over $192 to generate 10 leads for the business ($50,000 salary ÷ 260 articles = $192 per article). That's a solid chunk of change.

Now, if you ask this content creator to spend two days developing an A/B test on one article, instead of writing two articles in that time period, you might burn $192 because you're publishing one fewer article. But if that A/B test finds you can increase each article's conversion rate from 10 to 20 leads, you just spent $192 to potentially double the number of customers your business gets from your blog.

If the test fails, of course, you lost $192 -- but now you can make your next A/B test even more educated. If that second test succeeds in doubling your blog's conversion rate, you ultimately spent $284 to potentially double your company's revenue. No matter how many times your A/B test fails, its eventual success will almost always outweigh the cost to conduct it.

There are many types of split tests you can run to make the experiment worth it in the end. Here are some common goals marketers have for their business when A/B testing:

  • Increased Website Traffic: Testing different blog post or webpage titles can change the number of people who click on that hyperlinked title to get to your website. This can increase website traffic as a result.
  • Higher Conversion Rate: Testing different locations, colors, or even anchor text on your CTAs can change the number of people who click these CTAs to get to a landing page. This can increase the number of people who fill out forms on your website, submit their contact info to you, and "convert" into a lead.
  • Lower Bounce Rate: If your website visitors leave (or "bounce") quickly after visiting your website, testing different blog post introductions, fonts, or feature images can reduce this bounce rate and retain more visitors.
  • Lower Cart Abandonment: Ecommerce businesses see 40 – 75% of customers leave their website with items in their shopping cart, according to MightyCall. This is known as "shopping cart abandonment." Testing different product photos, check-out page designs, and even where shipping costs are displayed can lower this abandonment rate.

Now, let's walk through the checklist for setting up, running, and measuring an A/B test.

How to Conduct A/B Testing

Before the A/B Test

1. Pick one variable to test.

As you optimize your web pages and emails, you might find there are a number of variables you want to test. But to evaluate how effective a change is, you'll want to isolate one "independent variable" and measure its performance -- otherwise, you can't be sure which one was responsible for changes in performance.

You can test more than one variable for a single web page or email; just be sure you're testing them one at a time.

Look at the various elements in your marketing resources and their possible alternatives for design, wording, and layout. Other things you might test include email subject lines, sender names, and different ways to personalize your emails.

Keep in mind that even simple changes, like changing the image in your email or the words on your call-to-action button, can drive big improvements. In fact, these sorts of changes are usually easier to measure than the bigger ones.

Note: There are some times when it makes more sense to test multiple variables rather than a single variable. This is a process called multivariate testing. If you're wondering whether you should run an A/B test versus a multivariate test, here's a helpful article from Optimizely that compares the two.

2. Identify your goal.

Although you'll measure a number of metrics for every one test, choose a primary metric to focus on -- before you run the test. In fact, do it before you even set up the second variation. This is your "dependent variable."

Think about where you want this variable to be at the end of the split test. You might state an official hypothesis and examine your results based on this prediction.

If you wait until afterward to think about which metrics are important to you, what your goals are, and how the changes you're proposing might affect user behavior, then you might not set up the test in the most effective way.

3. Create a 'control' and a 'challenger.'

You now have your independent variable, your dependent variable, and your desired outcome. Use this information to set up the unaltered version of whatever you're testing as your "control." If you're testing a web page, this is the unaltered web page as it exists already. If you're testing a landing page, this would be the landing page design and copy you would normally use.

From there, build a variation, or a "challenger" -- the website, landing page, or email you’ll test against your control. For example, if you're wondering whether including a testimonial on a landing page would make a difference, set up your control page with no testimonials. Then, create your variation with a testimonial.

4. Split your sample groups equally and randomly.

For tests where you have more control over the audience -- like with emails -- you need to test with two or more audiences that are equal in order to have conclusive results.

How you do this will vary depending on the A/B testing tool you use. If you're a HubSpot Enterprise customer conducting an A/B test on an email, for example, HubSpot will automatically split traffic to your variations so that each variation gets a random sampling of visitors.

5. Determine your sample size (if applicable).

How you determine your sample size will also vary depending on your A/B testing tool, as well as the type of A/B test you're running.

If you're A/B testing an email, you'll probably want to send an A/B test to a smaller portion of your list to get statistically significant results. Eventually, you'll pick a winner and send the winning variation on to the rest of the list. (See "The Science of Split Testing" ebook at the end of this article for more on calculating your sample size.)

If you're a HubSpot Enterprise customer, you'll have some help determining the size of your sample group using a slider. It'll let you do a 50/50 A/B test of any sample size -- although all other sample splits require a list of at least 1,000 recipients.
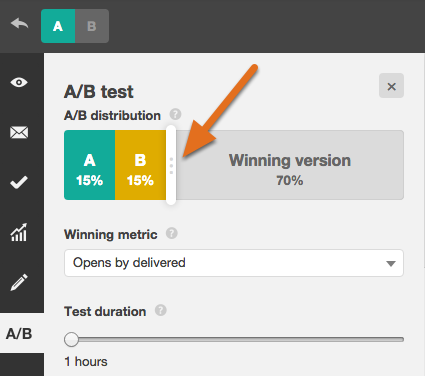
a/b testing sample size slider

If you're testing something that doesn't have a finite audience, like a web page, then how long you keep your test running will directly affect your sample size. You'll need to let your test run long enough to obtain a substantial number of views, otherwise it'll be hard to tell whether there was a statistically significant difference between the two variations.

6. Decide how significant your results need to be.

Once you've picked your goal metric, think about how significant your results need to be to justify choosing one variation over another. Statistical significance is a super important part of A/B testing process that's often misunderstood. If you need a refresher on statistical significance from a marketing standpoint, I recommend reading this blog post.

The higher the percentage of your confidence level, the more sure you can be about your results. In most cases, you'll want a confidence level of 95% minimum -- preferably even 98% -- especially if it was a time-intensive experiment to set up. However, sometimes it makes sense to use a lower confidence rate if you don't need the test to be as stringent.

Matt Rheault, a senior software engineer at HubSpot, likes to think of statistical significance like placing a bet. What odds are you comfortable placing a bet on? Saying "I'm 80% sure this is the right design and I'm willing to bet everything on it" is similar to running an A/B test to 80% significance and then declaring a winner.

Rheault also says you’ll likely want a higher confidence threshold when testing for something that only slightly improves conversation rate. Why? Because random variance is more likely to play a bigger role.

"An example where we could feel safer lowering our confidence threshold is an experiment that will likely improve conversion rate by 10% or more, such as a redesigned hero section,” he explained. "The takeaway here is that the more radical the change, the less scientific we need to be process-wise. The more specific the change (button color, micro copy, etc.), the more scientific we should be because the change is less likely to have a large and noticeable impact on conversion rate."

7. Make sure you're only running one test at a time on any campaign.

Testing more than one thing for a single campaign -- even if it's not on the same exact asset -- can complicate your results. For example, if you A/B test an email campaign that directs to a landing page at the same time that you’re A/B testing that landing page ... how can you know which change caused the increase in leads?

During the A/B Test

8. Use an A/B testing tool.

To do an A/B test on your website or in an email, you'll need to use an A/B testing tool. If you're a HubSpot Enterprise customer, the HubSpot software has features that let you A/B test emails (learn how here), calls-to-action (learn how here), and landing pages (learn how here).

For non-HubSpot Enterprise customers, other options include Google Analytics' Experiments, which lets you A/B test up to 10 full versions of a single web page and compare their performance using a random sample of users.

9. Test both variations simultaneously.

Timing plays a significant role in your marketing campaign’s results, whether it's time of day, day of the week, or month of the year. If you were to run Version A during one month and Version B a month later, how would you know whether the performance change was caused by the different design or the different month?

When you run A/B tests, you'll need to run the two variations at the same time, otherwise you may be left second-guessing your results.

The only exception here is if you're testing timing itself, like finding the optimal times for sending out emails. This is a great thing to test because depending on what your business offers and who your subscribers are, the optimal time for subscriber engagement can vary significantly by industry and target market.

10. Give the A/B test enough time to produce useful data.

Again, you'll want to make sure that you let your test run long enough in order to obtain a substantial sample size. Otherwise, it'll be hard to tell whether there was a statistically significant difference between the two variations.

How long is long enough? Depending on your company and how you execute the A/B test, getting statistically significant results could happen in hours ... or days ... or weeks. A big part of how long it takes to get statistically significant results is how much traffic you get -- so if your business doesn't get a lot of traffic to your website, it'll take much longer for you to run an A/B test.

In theory, you shouldn't restrict the time in which you're gathering results. (Read this blog post to learn more about sample size and timing.)

11. Ask for feedback from real users.

A/B testing has a lot to do with quantitative data ... but that won't necessarily help you understand why people take certain actions over others. While you're running your A/B test, why not collect qualitative feedback from real users?

One of the best ways to ask people for their opinions is through a survey or poll. You might add an exit survey on your site that asks visitors why they didn't click on a certain CTA, or one on your thank-you pages that asks visitors why they clicked a button or filled out a form.

You might find, for example, that a lot of people clicked on a call-to-action leading them to an ebook, but once they saw the price, they didn't convert. That kind of information will give you a lot of insight into why your users are behaving in certain ways.

After the A/B Test

12. Focus on your goal metric.

Again, although you'll be measuring multiple metrics, keep your focus on that primary goal metric when you do your analysis.

For example, if you tested two variations of an email and chose leads as your primary metric, don’t get caught up on open rate or clickthrough rate. You might see a high clickthrough rate and poor conversion rates, in which case you might end up choosing the variation that had a lower clickthrough rate in the end.

13. Measure the significance of your results using our A/B testing calculator.

Now that you've determined which variation performs the best, it's time to determine whether or not your results statistically significant. In other words, are they enough to justify a change?

To find out, you'll need to conduct a test of statistical significance. You could do that manually ... or you could just plug in the results from your experiment to our free A/B testing calculator. For each variation you tested, you'll be prompted to input the total number of tries, like emails sent or impressions seen. Then, enter the number of goals it completed -- generally you'll look at clicks, but this could also be other types of conversions.

hubspot-a-b-testing-calculator.png

The calculator will spit out the confidence level your data produces for the winning variation. Then, measure that number against the value you chose to determine statistical significance.

14. Take action based on your results.

If one variation is statistically better than the other, you have a winner. Complete your test by disabling the losing variation in your A/B testing tool.

If neither variation is statistically better, you've just learned that the variable you tested didn't impact results, and you'll have to mark the test as inconclusive. In this case, stick with the original variation -- or run another test. You can use the failed data to help you figure out a new iteration on your new test.

While A/B tests help you impact results on a case-by-case basis, you can also apply the lessons you learn from each test and apply it to future efforts. For example, if you've conducted A/B tests in your email marketing and have repeatedly found that using numbers in email subject lines generates better clickthrough rates, you might want to consider using that tactic in more of your emails.

15. Plan your next A/B test.

The A/B test you just finished may have helped you discover a new way to make your marketing content more effective -- but don't stop there. There’s always room for more optimization.

You can even try conducting an A/B test on another feature of the same web page or email you just did a test on. For example, if you just tested a headline on a landing page, why not do a new test on body copy? Or color scheme? Or images? Always keep an eye out for opportunities to increase conversion rates and leads.

Learn how to best carry out some of the steps above using the free ebook below.

The Ultimate A/B Testing Kit

Learn how to run effective A/B experimentation in 2018 here.


from Marketing https://blog.hubspot.com/marketing/how-to-do-a-b-testing

Friday, 28 December 2018

What Does HTTP 302 Mean?

If you've spent any time on the internet at all, chances are you've encountered an HTTP status code.

In simple terms, HTTP status codes are essentially standard response codes used to show the relationship between all the things that go on in the background when you travel from web page to web page: things like the user agent (i.e., your web browser), the web page you're trying to load, and any third-party web applications you might be running.

Because of the complexity of how all those things interact, there are a ton of possible HTTP status codes you can run up against. HTTP status codes can be used to identify and diagnose the particular blocker preventing you from loading a resource, or give you more information about the journey you took on the way to a page.

What Does HTTP 302 Mean?

One of the most common HTTP status codes is HTTP 302. This status occurs when a resource or page you're attempting to load has been temporarily moved to a different location -- via a 302 redirect.

As opposed to 301 redirects -- which are used to permanently direct users from one location to another -- 302 redirects are temporary. You usually won't notice a 302 redirect if it's set up correctly. The web server serving up the 302 redirect should immediately indicate the new location of the page to your browser, and should send you there right away.

If you want to see when you've encountered a 302 redirect (or any type of redirect), consider using an application or Chrome extension (like this one, Redirect Path). This type of tool will show you directly in your browser when you run into a redirect.

It's important to note that an HTTP 302 status code is caused by the web server you're attempting to reach. It's not an issue with your web browser, or anything you can control on your end of things.

If you're thinking about setting up 302 redirects on your own website, you should know that these types of temporary redirects aren't appreciated by Google. Google's crawler will follow and honor a permanent 301 redirect, but will ignore any temporary 302 redirects you set up. If you want to maintain your search ranking on a page you need to redirect to a new location, opt for a permanent 301 redirect instead.


from Marketing https://blog.hubspot.com/marketing/http-302

Thursday, 27 December 2018

5 Infographics to Teach You How to Easily Make Infographics in PowerPoint [Free Templates]

Despite the spattering of headlines that have popped up over the past several years proclaiming "infographics are dead," infographics are, in fact, alive and well.

Infographics aren't just alive and well -- they remain a staple in many business's content strategies. And while there are a lot of them, marketers who spend the time aligning the topic, content, and style of their infographics with the needs and preferences of their target audiences are still finding success among their audience.(And by "success" I mean driving traffic -- and potential leads -- to their websites and generating social buzz through people sharing and commenting.)

As of 2018, the use of infographics among B2B marketers has increased the most of any marketer in the last four years, now at 65%. And according to John Medina, a developmental biology expert, adding an image to written content can increase one's ability to retain that information by 55% (wow).

Download 10 free infographic templates here to help you create professional-looking infographics without a designer.

But how can those who don't necessarily have a design background -- or the budget to commission an agency, hire a dedicated in-house designer, or purchase expensive design software -- create professional-looking infographics that are able to captivate their audiences?

Here's a little secret: You can do it using the software you probably already have installed on your computer. That's right -- PowerPoint can be your best friend when it comes to visual content creation.

To help you get started, we've created 10 fabulous infographic templates you can download and use for free right within PowerPoint. Don't be shy ... download them here.

And in this post, we'll highlight five of the infographic templates from the download and teach you some PowerPoint infographic creation basics along the way. Just be sure to download the PowerPoint templates for yourself so you can easily customize the designs you see below!

5 Infographics That Teach You How to Create an Infographic in PowerPoint

1. How to Create an Infographic Filled With Data

Infographics and data visualization are the peanut butter and jelly of the visual content world.

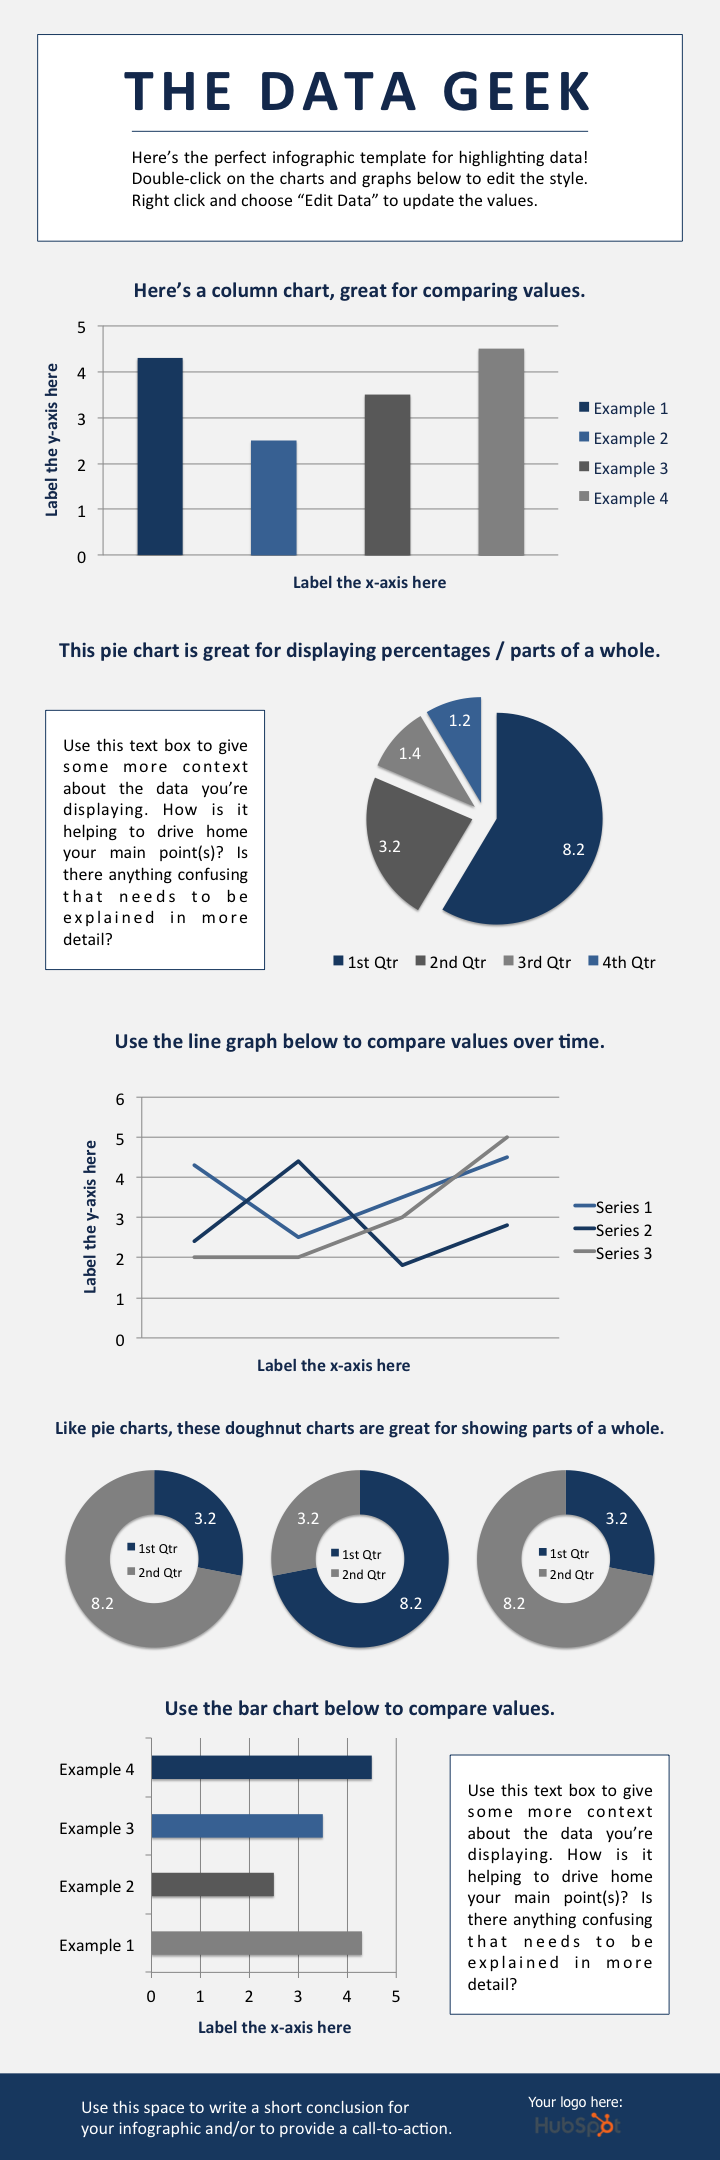
When you have new data to reveal to the world, you can use an infographic to display that data as part of a cohesive, visual narrative. And that's exactly what the "Data Geek" template is for.

The Data Geek infographic template

We've loaded this template with a variety of different charts and graphs, which you can easily update with your own data. (Just right click on a graph, choose "Edit Data," and you'll be able to customize the values in an Excel spreadsheet.)

Not sure which types of graphs to use for your different data sets? Here are some best practices to keep in mind:

  • Column chart: Use for comparing different categories or for showing changes over time (from left to right).
  • Pie chart: Use for making part-to-whole comparisons. (Note: They work best with small data sets.)
  • Line graph: Use for showing data that changes continuously over time. Ideal for displaying volatility, trends, acceleration, or deceleration.
  • Doughnut chart: Use like a pie chart. This stylistic variation allows you to put a number, graphic, or other visual in the center of the chart.
  • Bar chart: Use like a column chart. (The horizontal bars make it easier to display long category names.)

2. How to Make a Timeline Infographic

Telling the history of a particular industry, product, brand, trend, or tactic can be a great topic for an infographic. And while there are a variety of different ways that you can visualize time -- including in a circle, which is what we did with our Google algorithm updates infographic -- the timeline is by far the most common and easiest design method to use.

Before we describe how to create a timeline via our timeline infographic template, find out below how to design a timeline from scratch using PowerPoint.

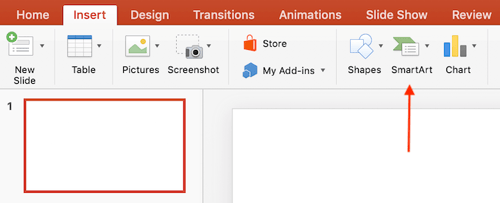
1. Select "SmartArt" from the PowerPoint navigation bar.

To make a timeline graphic in PowerPoint, suitable for any infographic, open PowerPoint and click "Insert" from the top navigation bar, as shown below. Then, select the SmartArt icon beneath the navigation bar, where you'll find several categories of graphics to choose from.

smartart-powerpoint

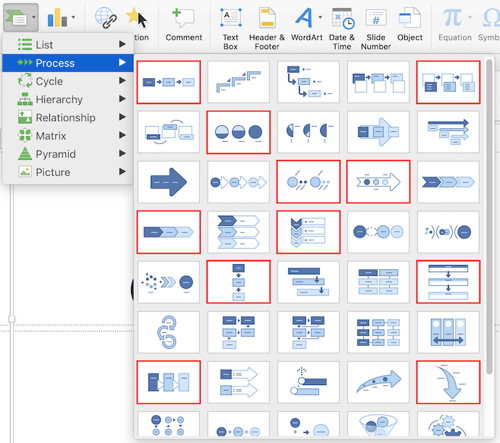
2. Find a graphic that fits your data from the Process menu.

There are two categories of graphics that make effective timelines. The first is the Process category. Click this option to expand the graphics menu shown below. To make your selection easier, we've highlighted in red a few of the most fitting timeline-related graphics.

processes-smartart-powerpoint

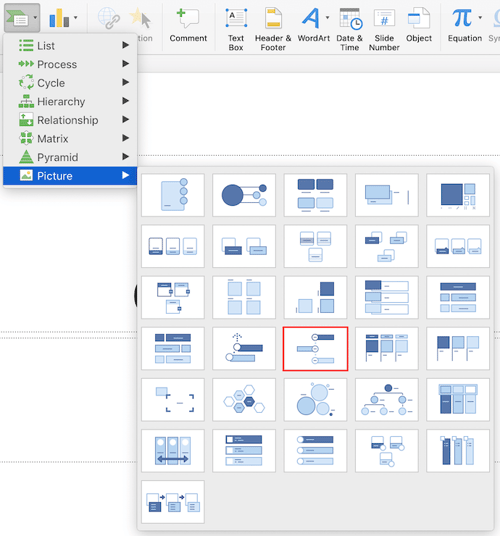
3. Or, select "Alternating Picture Circles" from the Picture menu.

Aside from the Process menu of graphics, you'll also find a viable timeline graphic in the Picture category. Select this category and you'll find the "Alternating Picture Circles" option near the center of the graphics menu. We've highlighted it in red, below.

pictures-smartart-powerpoint

4. Add or remove timestamps from your timeline graphic.

For the sake of these instructions, we'll use the "Alternating Picture Circles" graphic from the Picture menu. Once you've inserted this graphic into your first PowerPoint slide, you can add or remove circular icons to match how many dates or periods of time your data covers.

alternating-picture-circles-timeline

5. Insert your data into the graphic.

At this point, the size of your timeline graphic should match the amount of data you have. Begin to fill your timeline with the information you plan to report on using this timeline.

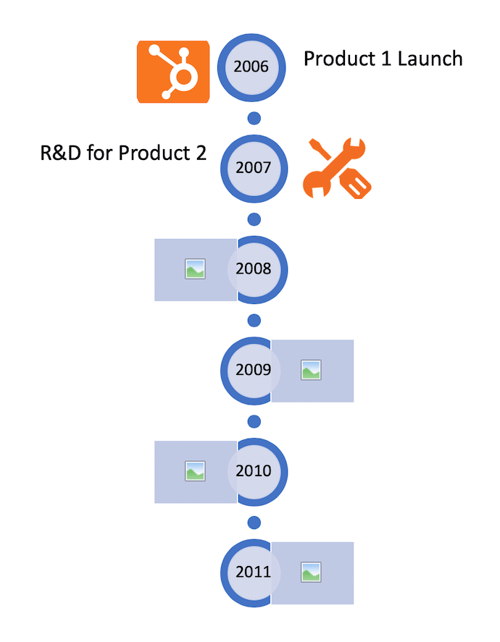
6. Edit the text and imagery of your SmartArt graphic.

As with the other graphics available in PowerPoint's SmartArt, you can edit the text and the images associated with your timeline to your liking. As you can see below, we've edited the years and the images to better represent what happened at each point in time.

To insert images into your timeline graphic, simply right-click the square landscape icon, select a graphic "From File," and upload an image from your computer onto your PowerPoint slide.

powerpoint-timeline-graphic

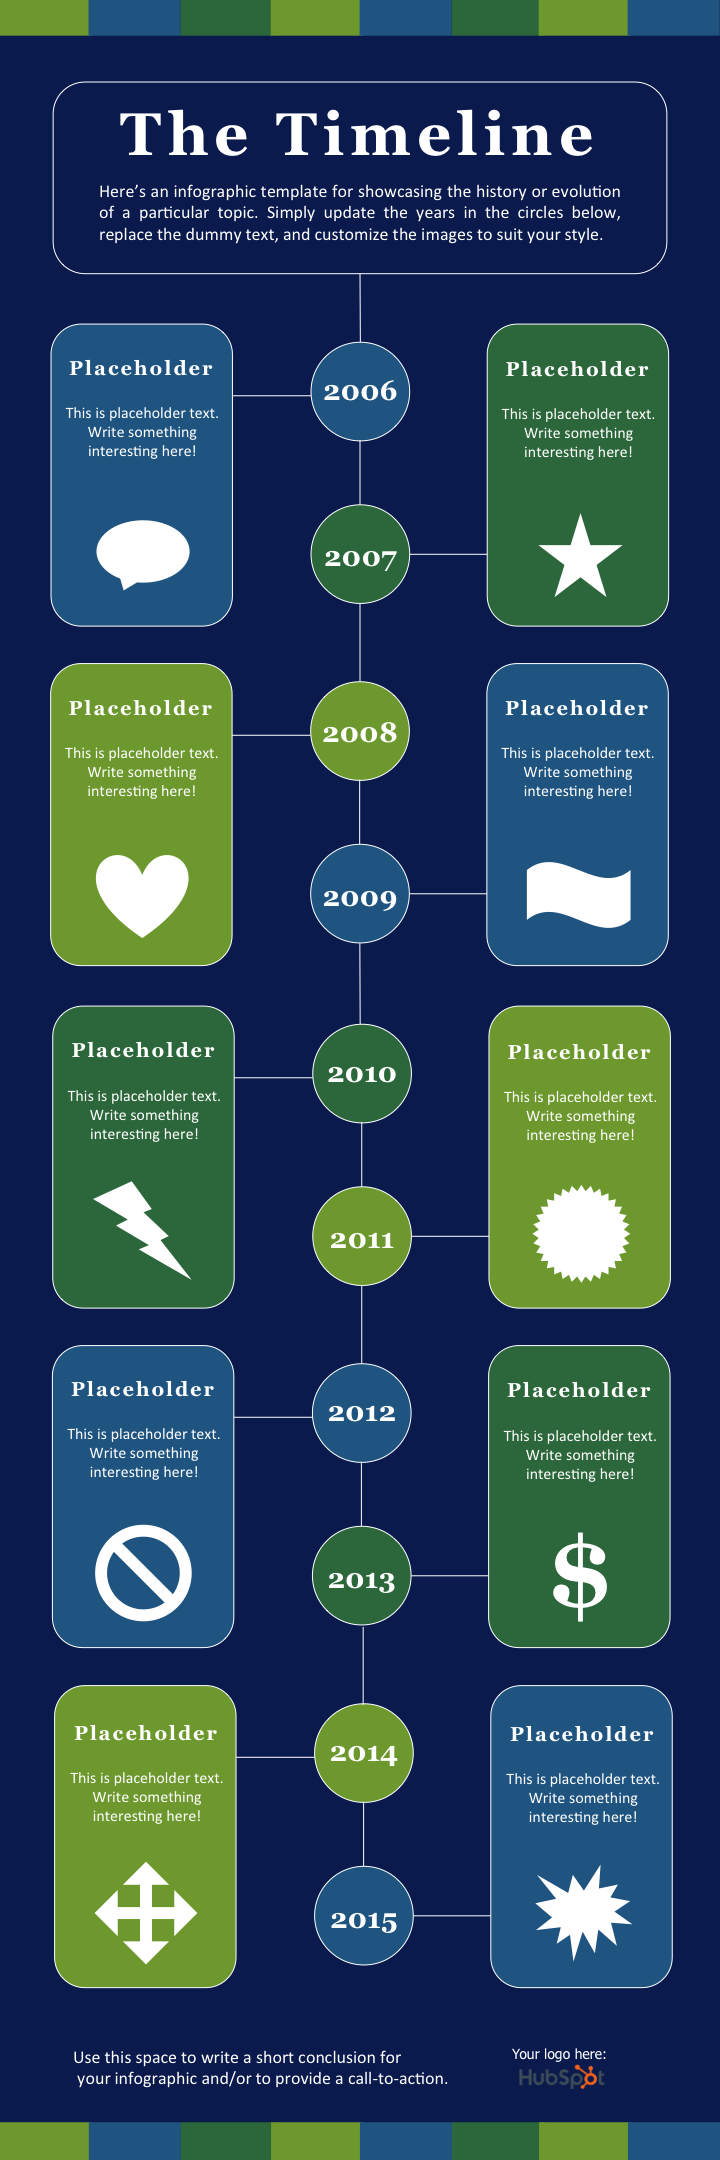
Of course, if you're willing to give up a tiny bit of creative freedom for a ton of convenience, you can download the timeline infographic template below -- which opens directly in PowerPoint.

To tell your story with our timeline infographic template below, update the time periods in the center circles, replace the placeholder text, and adjust the visuals and colors to your liking. For those latter adjustments, you can choose "Insert" > "Shape in PowerPoint" to add in different visuals, and use the paint bucket (a.k.a. "color fill") icon to change the colors of different elements.

The Timeline infographic template for PowerPoint

Want to make sure your timeline infographic hits all the right notes? Here are some tips to consider:

  • Research. Research. Research. The best timeline infographics aren't just beautifully designed -- they also tell a great story based on extensive research. So before you start the design phase of your infographic, put in the time to surface the best information possible.
  • Narrow the scope: Timelines that cover hundreds or thousands of years can certainly be interesting, but they can also require weeks or months of research. To keep your sanity, stick with shorter time periods.
  • Keep your copy concise: Infographics are supposed to be visual. If you find yourself writing 100+ words for each date on your timeline, a blog post may be the better content format.

3. How to Design a Totally Hip Infographic

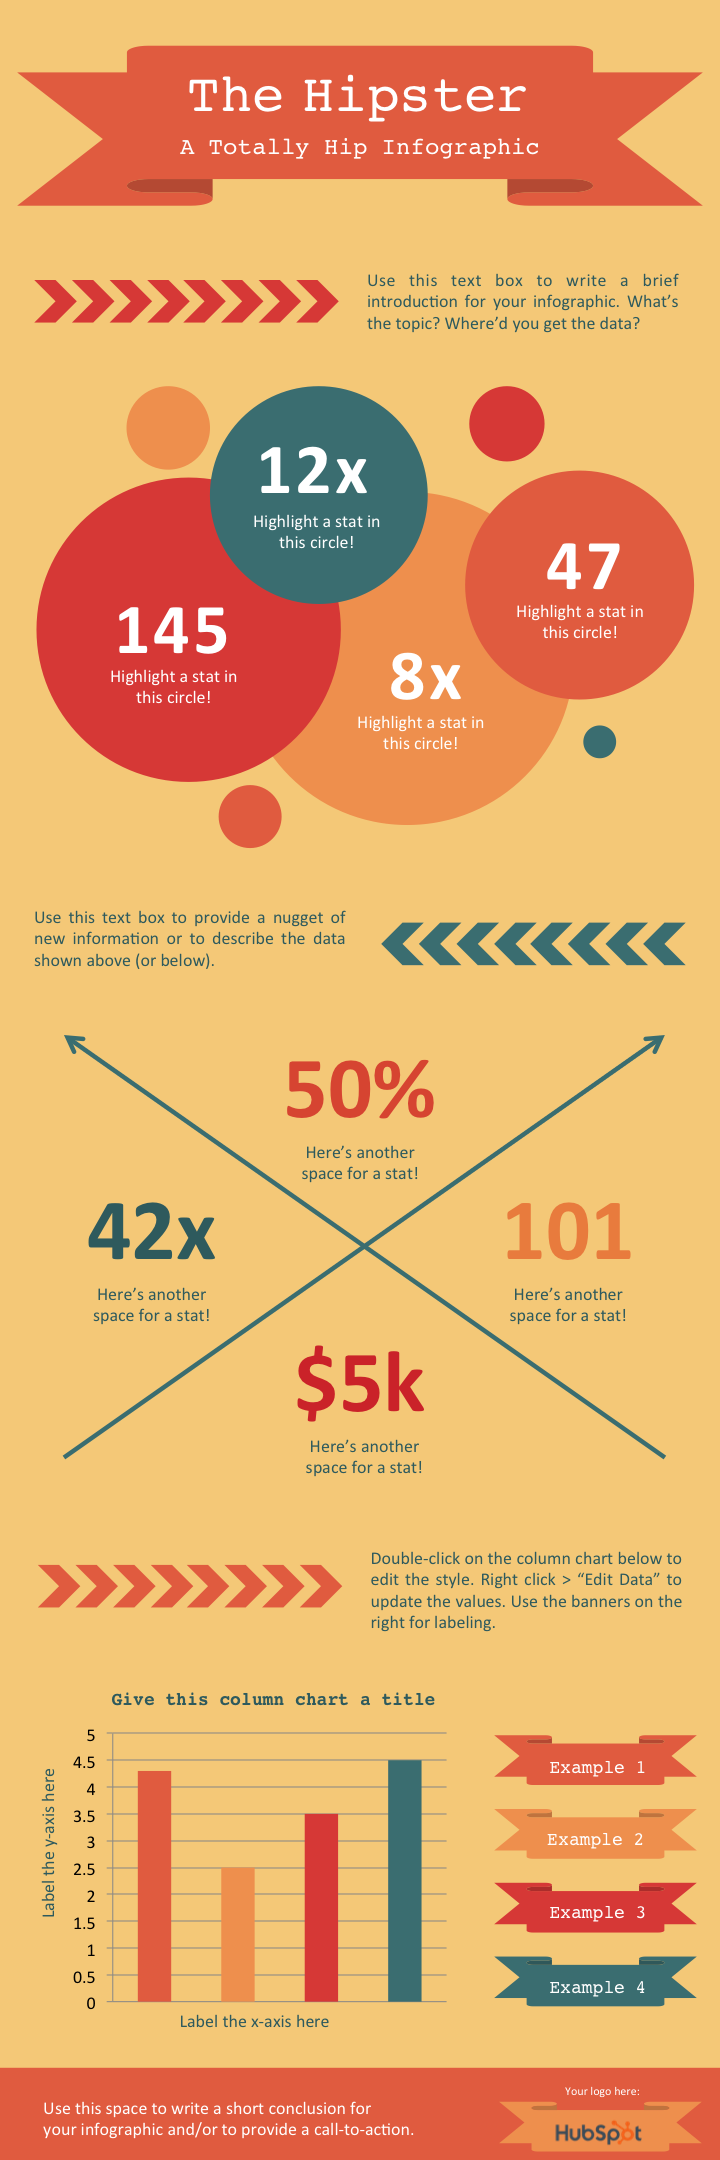
Ok, so "hipness" is definitely in the eye of the beholder. But for this infographic template we wanted to do something that reflected modern design trends, including using banners and arrows.

In terms of content, we provided plenty of space for both stats and copy. There's also a column chart at the bottom. But remember, you can always add different charts and graphs to the template wherever you see fit. Just select "Insert" > "Chart ..." and you'll have several options to choose from.

The Hipster infographic template

To make sure your end result is as hip as possible, here are some design tips to follow:

  • Experiment with new color palettes. There are tons of free color palettes online. Don't believe me? Do a Google image search of "color palette." When you find a palette you like, drag the image directly into your PowerPoint presentation. Next, select the "color fill" bucket, choose "More Colors ..." and click on the eyedropper icon. With the eyedropper tool, you can select colors from your palette and use them for elements in your infographic.
  • Take the time to manipulate shapes. PowerPoint has an extensive library of shapes -- including banners, ribbons, and arrows -- that you can use in your infographic design. By clicking and dragging on the little yellow diamonds that appear on these shapes, you can customize them. For example, you can make the pointy ends of a ribbon longer or shorter, or make the body of an arrow thinner or thicker.

4. How to Create a Flowchart Infographic

Warning: Creating a flowchart-style infographic is not for the faint of heart.

While on the surface a flowchart infographic may appear simple and fun, a lot of thought and planning need to go into making sure the different sections flow into each other in a logical way.

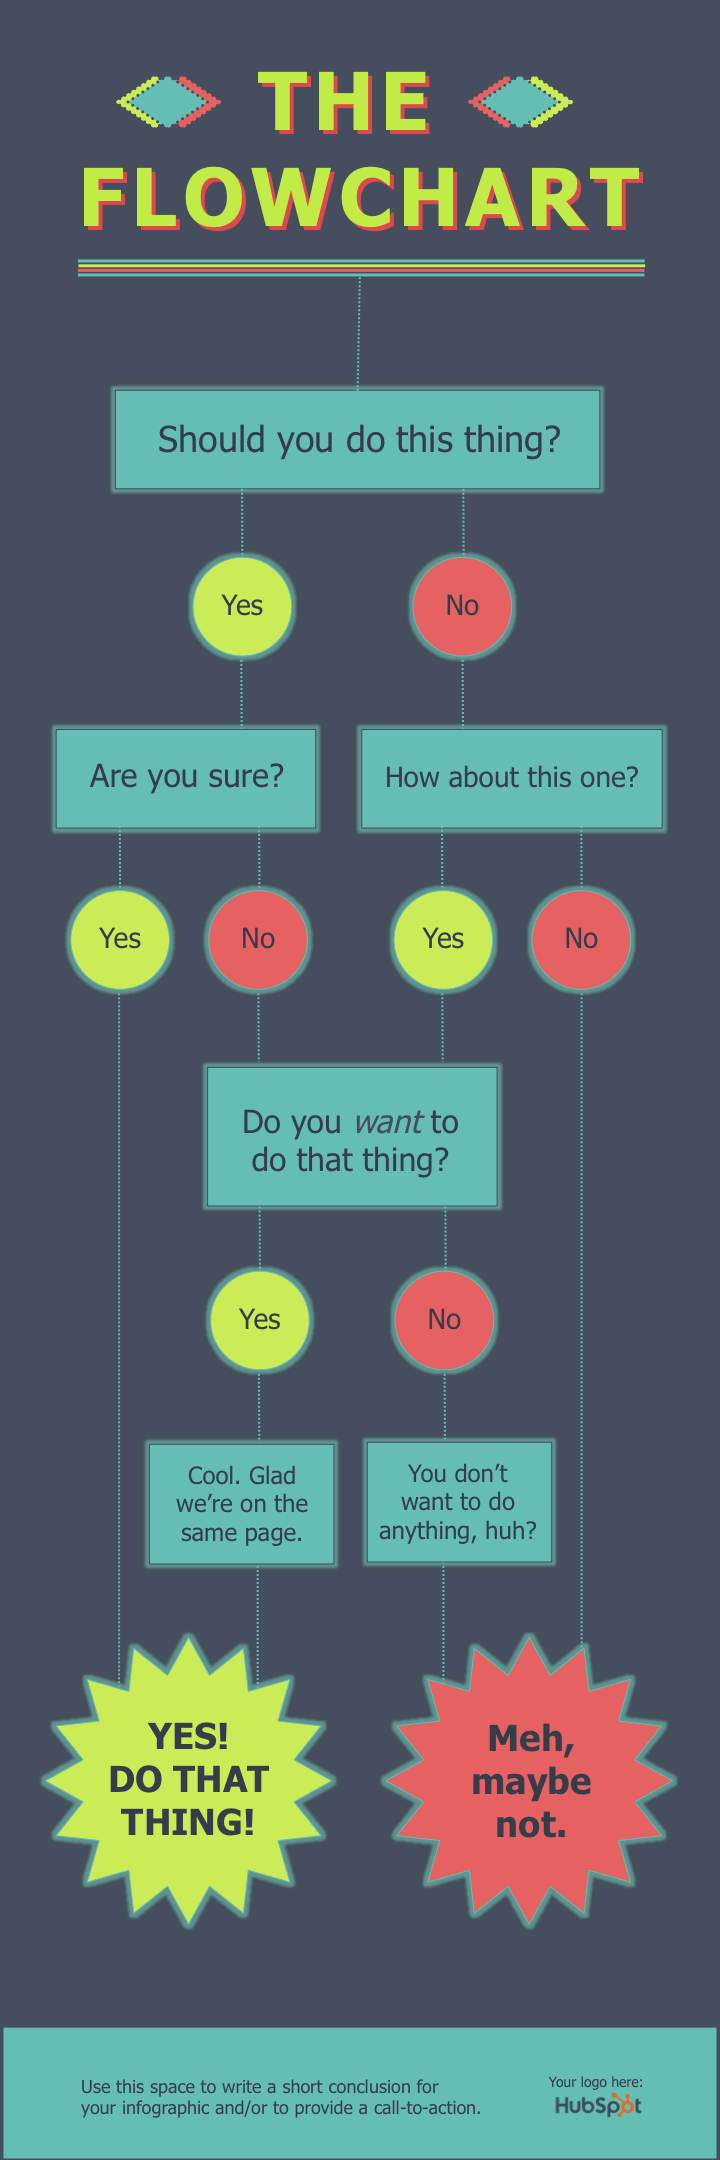
In our flowchart PowerPoint template, we created a basic flowchart structure, with positive responses guiding viewers to a conclusion at the bottom left of the infographic and negative responses guiding viewers to a separate conclusion at the bottom right of the infographic.

The Flowchart infographic template

To ensure your flowchart infographic makes sense and is easy for viewers to navigate, follow these tips:

  • Draw out the branches beforehand. Before you dive into PowerPoint, get out a pen and paper and do a rough outline of your flowchart. Test for weaknesses in your logic by answering questions in every possible combination and seeing where you end up. For best results, have a friend or coworker run through the flowchart too.
  • The smaller the scope, the easier the execution. The more questions or stages you add to your flowchart, the more difficult it will be to create (and the harder it will likely be for viewers to understand). So try to narrow the focus of your flowchart.

5. How to Design an Image-Heavy Infographic

So far, the infographic templates we've looked at have relied primarily on illustrations that you can create within PowerPoint. But of course, there's no reason why you can't bring external photos and other images into your infographic design.

We've created this image-heavy infographic template for that exact purpose. It's great for comparing different categories, ideas, or results, and since you don't need to create or customize a lot of shapes, it's a lot less work.

Image Heavy infographic template

Here are some suggestions for ensuring your image-heavy infographic is easy on the eyes:

  • Use high-quality images. It's better to scale down a big image (e.g. 2,000 pixels by 2,000 pixels) than to scale up a small image (e.g. 20 pixels by 20 pixels) in order to fit a particular space. The latter approach will result in images appearing pixelated and grainy.
  • Use borders. Adding borders to your images will help make them feel like their part of a cohesive design. In PowerPoint, you can control the size, style, and color of borders under the "Format Picture" tab.
  • Save your infographic as a PNG file. This is a best practice for all infographics, but is particularly relevant when publishing an infographic that contains photographs. The PNG extension offers better quality than other options. To save your finished infographic as a PNG file, you simply need to choose "File" > "Save As ..." and select PNG from the dropdown.

What are you waiting for? Grab your free infographic templates so you can start customizing fantastic-looking infographics of your own!

Want to learn more about infographics? Check out 10 Traits of Amazingly Awesome Infographics.

15 free infographic templates in powerpoint


from Marketing https://blog.hubspot.com/marketing/create-infographic-in-powerpoint

9 Important Elements to Include in Your Employee Handbook

An employee handbook is a critical document for setting clear expectations for new employees, providing policies for all employees to follow, and making it easier for you know how to deal with problems with your employees when they arise.

Among other things, your employee handbook should cover everything from dress code and vacation days to your code of conduct and nondiscrimination policies.

Additionally, it should set the tone for what it's like to work at your company -- your employee handbook isn't just a list of "what not to do". It's also a chance to express your company mission statement, and workplace culture.

For instance, maybe you want to allow for casual dress Friday's, to provide your employees the opportunity to feel more comfortable before the weekend. This is an exciting employee benefit, and one you should clearly outline.

Here, we'll cover the nine elements you must include in your employee handbook in an employee handbook template, and provide a sample employee handbook for further inspiration.

Employee Handbook Template

To know what to include in your employee handbook, take a look at our template.

Employee Handbook for [Company Name]

Introduction to company & values.

Here, you'll want to describe your company's history, including when you were founded, by whom, and why. Additionally, you'll want to briefly include your company mission statement, and add some insight into your company culture. What do you prioritize in the workplace? Autonomy, continuous education? Include that here. Essentially, give your new employee the elevator speech of why your company matters, and why they should be excited to be apart of it.

Code of conduct

In this section, you need to give your employees a general overview of information regarding ethics and compliance. Ultimately, a code of conduct allows you to emphasize your company's values, and the desired behavior you wish to foster in your leaders and employees. These rules can allow you to fairly regulate and assess an individual's behavior.

You'll want to include as many specific details as possible -- for instance, let employees know your definition of excessive tardiness, and how tardiness will be disciplined. Alternatively, you might include specific dress code requirements in this section.

Additionally, your code of conduct section will be a reference point for employees when they're dealing with difficult ethical dilemmas in their day-to-day. It's a section that tells them what your company values and considers right from wrong, along with resources for employees when they encounter ethical predicaments.

Equal employment and nondiscrimination policy

The U.S. Department of Labor requires many businesses to include an equal employment and nondiscrimination policy in their employee handbook. Plus, you want each employee to know that discrimination or harassment of any kind won't be tolerated in your workplace. Even just one instance of discrimination can create toxicity for an entire company's culture.

Computers and technology policy

You'll need to make clear what your employees can and can't do with the technology you provide them. Among other things, let employees know whether you have the right to see emails they send on company computers, whether you expect them to avoid social media while on their work computer, and how much privacy they should expect while using company property.

Additionally, you'll want to inform your employees whether certain actions on company technology are fireable offenses.

Compensation and benefits policy

Simply put, your employees want to know about their benefits regarding health care, dental, vision, life insurance, stocks, etc. In this section you can also let them know about benefits such as tuition reimbursement, commuter benefits, parking, employee referral bonuses, and 401(k) plans.

You'll also want to include critical information regarding salary, payroll deductions, and compensation increases for specific job descriptions to convey how each employee can advance their income. Additionally, you'll want to document the payment schedule for each employee (weekly or bi-monthly).

New hire and separation policy

Let your new employees know whether they need to wait to receive their benefits (and how long), what steps need to be taken if an employee wants to quit, and information regarding your progressive discipline policy. By outlining the steps you take for discipline, you're ensuring a level of fairness and establishing prohibited behavior.

You'll also want to outline what an employee is entitled to if they are terminated, and for how long they can expect certain benefits.

Leave policy

It's critical you outline how much paid and unpaid vacation time each employee gets, as well as how much time they get for medical leave and paid family leave, as well as sick time. Some of these policies, such as family medical leave, are enforced by the U.S. Department of Labor, so you'll often need to comply by the same standards as other businesses in your state.

Non-disclosure Agreement and Confidentiality policy

To ensure your employees don't misuse confidential information either regarding your internal operations or your clients, it's critical you outline what you constitute as confidential information. Your business is bound by law to protect certain information, and you'll want to make a list and ensure your employees are aware of what information they can and can't share. Among other things, this likely includes your company's internal business plan, your client's information, and employees' financial account information.

Signature page

A signature page is important for two reasons -- first, it confirms the employee received the handbook, and incentivizes each employee to read it through before signing. Second, if you're ever dealing with a wrongful termination lawsuit, it could help with your defense.

Sample Employee Handbook

While your employee handbook will be undoubtedly unique and particular to your culture and company values, we've created a sample employee handbook to help get you started.

However, many of these sections are too personal and legally sensitive to include in a sample. For instance, when writing a non-disclosure agreement, you'll need to review state and federal laws and will need the guidance of a lawyer.

Employee Handbook for Healthy Tea & Co.

Introduction to company & values.

Welcome to Healthy Tea & Co.!

Started in 2011, Healthy Tea & Co. aims to create healthy, organic tea and drink products and market them to people who want to live healthier lives. Founded by Hannah Jones and Mark Pluto, we pride ourselves on being a workplace that focuses on employee happiness and autonomy, diversity and inclusion, and helps our customers find products on the shelves that are both delicious and nutritious.

What is important to know when joining our team at Healthy Tea & Co.?

We value independence and autonomy, and for that reason, we allow our employees to work either in-office or remotely.

We like to have fun, which is why we have casual-dress Friday's, ping pong tables, and monthly team outings.

We encourage continuous learning and want our employees to seek out growth opportunities, so we offer employee-taught trainings on a variety of topics, tuition reimbursement, and a free book program.

Ultimately, as an employee at Healthy Tea & Co., we expect you to remain honest and trustworthy with your team, willing to think outside the box, and excited to experiment and ask questions about our products and our systems, because we as a company value growth and innovation.

[Code of conduct would go here]

Compensation and benefits policy

The amount of compensation you will receive is provided in your offer letter.

In addition, Healthy Tea & Co. must deduct specific amounts from your paycheck. These mandatory deductions (required by federal law) include:

● Social security (pre-tax)

● Medicare (pre-tax)

● Federal withholding taxes (pre-tax)

● State withholding taxes (pre-tax)

Health & Wellness Benefits include:

[Medical, Dental, and Vision Insurance would go here, as well as Life Insurance, Dependent care, Healthcare Spending Account, Accident Insurance, etc.]

Leave policy

At Healthy Tea & Co., our vacation policy for PTO entails the following:

0-2 years tenure = 15 days

2-5 years tenure = 20 days

6+ years tenure = 30 days

Additionally, in compliance with state laws, we offer 5 sick days, which can be used for personal illness or to take care of a sick family member.

In the U.S., we observe the following holidays:

  • New Year's Day
  • Martin Luther King Jr. Day
  • Presidents Day
  • Patriots Day
  • Labor Day
  • Thanksgiving Day
  • Christmas Day

[Financial benefits, such as 401(k) or employee referral bonus, would go here]

[Equal employment and nondiscrimination policy would go here]

[Computers and technology policy]

[Anti-discrimination policy would go here]

I have read all of the provisions of this agreement and I understand, and agree to, each of such provisions, effective as of the date first entered above. 

________________ (sign here)

________________ (date)

Code of Conduct Samples

To ensure you have all the inspiration you need to create your own code of conduct section in your employee handbook, take a look at some of these inspiring company code of conducts':


from Marketing https://blog.hubspot.com/marketing/employee-handbook

Turnover Rate: What It Is & How to Calculate It

Seeing your employees leave for new opportunities can be a bittersweet experience. At first, you’re sad to see them go, especially if you’ve developed a close bond with them. But you also know that they’re moving onto bigger and better things -- and you're excited for them

However, if employee departure starts to become a regular occurrence at your company, the feeling should become more bitter than sweet, and eventually turn into concern.

Having a high turnover rate means your culture might be toxic, or your employees don’t feel fulfilled working at your company. Constantly replacing employees can also skyrocket costs and plummet productivity -- if your company is a revolving door, you not only have to spend money recruiting and interviewing candidates, but you also have to train new hires who need a significant amount of time to be able to tackle a full workload.

Fortunately, there’s a way to determine if your turnover rate and, in turn, your company culture is healthy. Read on to learn how to do it.

To help you calculate your own turnover rate, let’s run through a quick example.

Employees at beginning of the year: 500

Employees at the end of the year: 600

Average number of employees: (500+600)/2 = 550

Number of employees who left this year: 40

Turnover rate: 40/550 = 7.27%

If you want to see the average turnover rate of your industry, LinkedIn analyzed their network of 500 million professionals to compile a report of the industries with the highest turnover rate in 2017. Below, we listed the 10 industries that experienced the highest turnover last year.

Average Turnover Rate By Industry

Technology (Software) 13.4%
Retail & Consumer Products 13.0%
Media & Entertainment 11.4%
Professional Services 11.4%
Government/Education/Non-Profit 11.2%
Financial Services & Insurance 10.8%
Telecommunications 10.8%
Oil & Energy 9.7%
Aero/Auto/Transport 9.6%
Healthcare & Pharmaceutical 9.4%

Remember, the severity of your company’s turnover rate completely depends on your industry. So to accurately gauge the health of your company’s turnover rate and culture, make sure to reference this blog post or keep an eye out for LinkedIn’s industry turnover analysis each year.


from Marketing https://blog.hubspot.com/marketing/turnover-rate

Wednesday, 26 December 2018

The Ultimate Guide to Cryptocurrency

When I first heard of cryptocurrency, I thought it was similar to PayPal or Venmo … a simple, digital exchange of money. You can imagine my surprise when I learned that cryptocurrency wasn’t only a digital exchange, but an exchange of a completely new currency.

I could hardly wrap my mind around it. I was this emoji personified: 🤯.

How could a brand new (albeit invisible) currency work? What could you buy? Did people actually accept it? What stopped people from not believing in it?

I had lots of questions … and I still do. Cryptocurrency is a complex, ever-changing topic that affects consumers, investors, and business owners alike. Below, we tackle some of those questions and highlight the most important aspects of cryptocurrency. By the end, you should have enough of an understanding to chime into those dinner party conversations with a fact or two.

Bitcoin was the first cryptocurrency. Since its conception in 2009, which occurred in response to the banking crisis and housing market crash, hundreds of other cryptocurrencies have been created … and have failed.

Your Cryptocurrency Dictionary

Before we dive into the world of cryptocurrency, let’s review a few key terms frequently used in this guide and when discussing the concept.

Altcoins

Altcoins is slang for “alternative coins.” Altcoins refer to every other cryptocurrency besides Bitcoin.

Blockchain

All cryptocurrency transactions are recorded on the blockchain, a public record used to verify digital currency transactions and prevent scams. Transactions are recorded on blocks, and a new block is added to the chain roughly every 10 minutes. We explain blockchain further in the video below.

Cryptography

Cryptography refers to the act of writing in or deciphering a code. Cryptography (where we get the “crypto” in cryptocurrency) is a type of mathematics that creates secure transactions and online environments, i.e. “encrypted” accounts or currency.

Fiat

Fiat currency is paper money like the US dollar or Euro.

Mining

Cryptocurrency mining is a proof-of-work (PoW) system where miners solve math problems to validate every cryptocurrency transaction. These minters get cryptocurrency in exchange for their time and resources. These complicated mathematical calculations also increase the security, transparency, and value of cryptocurrency. Mining is only one way — the hardest way — to obtain cryptocurrency. The reward for solving these math problems varies per currency but is more profitable than any other method (besides an outright purchase).

Nodes

Nodes are computers that are part of the global cryptocurrency blockchain network. They serve to verify transactions recorded on the blockchain. Even if one node attempted to validate an incorrect transaction, the transaction wouldn’t go through as they require multiple validations (and that node would be disconnected) … making cryptocurrency a virtually incorruptible network.

Private Key

A private key is a secure “password” that gives cryptocurrency owners access to their wallets. Each wallet has its own private key, and without it, users couldn’t access their coins.

Public Address

A public address is similar to an email or physical house address. (It looks like this: 1GV5Vye4LCfpkM9V5oFSQsZk8kq2vBxvCK.) To send cryptocurrency, you simply need the recipient's public address. It’s the only public-facing piece of data on the blockchain, and each transaction uses a unique address.

Benefits and Drawbacks of Cryptocurrency by Feature

Both support and speculation exist in the world of cryptocurrency. Some hate it, some love it, and most are confused by it. It’s a brand new concept that sparks a whole barrage of questions and concerns.

Below, we explain the core features of cryptocurrency and the positive and negative perspective of each.

Feature

Benefits

Drawbacks

 
Security Cryptocurrency transactions are secure and private, creating valuable anonymity despite their very public (yet non-identifying) validation method on the blockchain. Security, privacy, and anonymity make it easy to use cryptocurrency for less-than-legal purposes.
Affordability Cryptocurrency has low transaction costs and in-between fees you might find at banks or payment gateways. Cryptocurrency isn’t accepted by everyone, which could cancel out its affordability altogether.
Volatility The volatility of cryptocurrency can yield a high-reward (high-risk) investment. Due to its volatility, cryptocurrency turns many people off from investing ... which could lower its value over time.
Decentralization Cryptocurrency isn’t regulated or valued by a financial institution or central government, which eliminates the middleman, a penchant for corruption, and creates a truly global currency. It’s monitored by a peer-to-peer internet protocol. Many people relate cryptocurrency to the Silk Road … such a decentralized, deregulated asset couldbe used for both legal and illegal purposes. There’s also no way to recover lost coin.
Digitalization Cryptocurrency doesn’t deal in physical coin or paper money, leaving little room for loss, theft, or misuse. Cryptocurrency is purely digital, and you can’t recover lost coin or repeal validated transactions. The “invisibility” of cryptocurrency can also make it hard to trust.
Inflation

Cryptocurrency isn’t inflationary — there’s a set amount that can be mined and circulated.

Cryptocurrency will likely never become a central currency because of its non-inflationary, inflexible elements.
Creation Cryptocurrency is released through mining, which anyone can do with the proper resources — a computer and internet. Cryptocurrency mining consumes a ton of energy and resources.. (In fact, miners are on track to use more energy than Argentina.)

How is Cryptocurrency Created?

Cryptocurrency is released into the economy through the process of mining, as we defined above. But how do these digital coins become a legitimate currency in the first place?

Cryptocurrency creation depends on three main things:

  1. A community of people who believe in the purpose of the coin and network … and who will eventually mine and evangelize it
  2. A code to create and encrypt the software and blockchain network on which the currency will operate (which is relatively easy as most cryptocurrencies are based on the open source code of Bitcoin available on Github)
  3. The confidence of merchants to value and do business with the currency, further building trust among consumers, investors, and the general public

There’s obviously a lot more that goes into creating a cryptocurrency, but these are the main three elements that lead to its legitimacy and acceptance. Third parties like WalletBuilders also offer to create cryptocurrency for you.

Creating Your Own Cryptocurrency

Nowadays, a lot of businesses are creating their own cryptocurrencies — through a crowdfunding process known as an initial coin offering (ICO). ICOs are when startups raise money by creating their own digital token that can be spent on current or future products or services.

Companies who participate in ICOs exchange their token for established cryptocurrencies like Bitcoin. Some ICO investors keep their tokens for future use or trade them on cryptocurrency exchanges as they would stock.

To learn more about creating or investing in an IPO, check out our guide here.

Types of Cryptocurrency

As of today, there are over 2,500 active cryptocurrencies, most of which serve as more than a simple payment system. Below we’ll review a four of the most popular, listed from oldest to newest.

1. Bitcoin

Bitcoin (BTC) is the first and most famous cryptocurrency. It’s been around for almost 10 years and has been hailed as the “digital gold” of the industry.

Today, 1 BTC is equal to $4,087.63 USD. There are currently 17,433,962 BTC in circulation, and the max supply is 21 million BTC.

Psst. Read more about Bitcoin in our ultimate guide here.

2. Litecoin

Created in 2011, Litecoin (LTC) was introduced as the “silver” to Bitcoin’s “gold.” It was intended to be used as a lighter, more nimble currency for everyday transactions. Litecoin is a replica of Bitcoin, just on a much smaller scale — it’s faster to mine, holds a smaller value, has a greater market cap, and operates on a much more flexible algorithm.

Today, 1 LTC is equal to $32.42 USD. There are currently 59,665,588 LTC in circulation, and the max supply is 84 million LTC.

3. XRP by Ripple

XRP is the cryptocurrency released by Ripple. Founded in 2012, Ripple was formed to expedite and improve cross-border payment transfers and the global payments system as a whole. The company itself is more of a network to process IOUs, and XRP serves as a currency transfer tool and token against spam — the currency itself holds no real value ( meaning you can’t buy anything with it).

Ripple designed XRP to function on a unique blockchain that validates its transactions over 200 times faster than Bitcoin. XRP also requires no mining — the only way to attain the currency is to purchase it on a cryptocurrency exchange.

Today, 1 XRP is equal to $0.370595 USD. There are currently 40,762,365,544 XRP in circulation, and the max supply is 100 billion XRP.

4. Ether by Ethereum

The Ethereum network hosts both a decentralized computer system and payment system, through its main token, Ether (ETH), along with a handful of others. Ether can be traded as a cryptocurrency, but it’s more commonly used to pay for transaction fees and services on the Ethereum network.

Launched in 2015, Ethereum uses blockchain to replace centralized computing systems (like Google, Apple, and Amazon) that regulate, censor, and control user data on their applications. A decentralized network gives power back to the users and removes the security risk of a centralized system. Along with payment transactions, Ethereum also processes and validates programs and contracts, such as insurance payouts. Ethereum’s average block mining time is 12 seconds.

Today, 1 ETH is equal to $117.59 USD. There are currently 103,925,546 ETH in circulation, with no set limit on its total coin supply.

Other top cryptocurrencies include Bitcoin Cash (price: $207.34 USD), EOS (price: $2.66 USD), Stellar (price: $0.124446 USD), and Tether (price: $1.02 USD).

How to Get and Store Cryptocurrency

Cryptocurrency can either be earned or purchased. You can earn cryptocurrency, by mining it or completing tasks in exchange for it.

You can purchase cryptocurrency in a few different ways. For one, you can invest in an ICO (as we explained above). You can also purchase cryptocurrency from another individual through sites like LocalBitcoins.

The easiest (and arguably most secure) way to buy cryptocurrency, though, is on an exchange like Coinbase or GDAX. Cryptocurrency exchanges simply require fiat money to make the purchase, typically from a debit card. You can also seek out a Bitcoin ATM, which operates just like your typical bank ATM.

So, what do you do with your cryptocurrency after you earn or purchase it?

Well, all cryptocurrency technically lives on the blockchain. But individual owners keep track of and manage their cryptocurrency through wallets.

Your wallet stores your private key and public address. Without your private key, you cannot access or verify purchase of your cryptocurrency, so it’s essentially the most valuable piece of your cryptocurrency ownership.

The most popular type of wallet is a software wallet like Coinspace (which also serves as an exchange). You could also use a desktop or paper wallet, which we explain further in our guide to Bitcoin here.

Note: Cryptocurrency is a largely unregulated and tumultuous market, and it’s notorious for scams. That being said, we highly recommend doing plenty of research before investing in any cryptocurrencies.

Cryptocurrency Resources

This guide simply scratches the surface of the cryptocurrency world. If you want to learn more about mining, purchasing, or investing in cryptocurrency, check out the resources below:

  • Coindesk, a trusted news outlet on cryptocurrencies
  • Coinmarketcap, a live ledger of the current market value of cryptocurrencies
  • The Cryptocurrency Reddit, an online forum discussing cryptocurrency news, trends, and analysis
  • Online Cryptocurrency courses on Udemy and Coursera

Over to You

Between mining, blockchain, and wallets, there’s a lot that goes into cryptocurrency. It’s well-established in our economy, but it sure hasn’t triumphed every marketplace and merchant.

If anything, cryptocurrency is a sign of how advanced and open-minded our economy is. We’re willing to take new risks and try new things in order to businesses, bank accounts, and futures secure. Is cryptocurrency guaranteed? Absolutely not. But it might be something worth exploring you’re looking to spice up your portfolio or try something new.


from Marketing https://blog.hubspot.com/marketing/cryptocurrency

Tuesday, 25 December 2018

The Social Media Content Calendar Template Every Marketer Needs [Free Template]

"We have a 9 a.m. meeting? Hold on -- let me just click around the internet like a maniac to find something for the morning tweet." 

Sound familiar? Scrambling for social content is nothing new. We have meetings. We run late. Things come up. And it's really hard to get any meaningful amount of work done when you have the next social media update looming over your head every 30, 60, or 90 minutes. It all moves so fast that you might periodically feel a case of the vapors coming on, which is why pre-scheduled social media content should be your new best friend.

To make social media content easier for companies to plan and schedule across the accounts they manage, we created a social media content calendar template. And recently, we updated to be better, faster, stronger, and just generally prettier. 

You can fill it in at the same day and time every single week to prep for the following week's social media content. That means when you burst through the office doors at 9 a.m., you won't be in panic mode looking for something to push out to your Facebook fans -- you already took care of that last week.Manage and plan your social media posts with the help of this free calendar template.

This blog post will walk you through exactly how to use the template to stay on top of your social media content planning for Facebook, Twitter, LinkedIn, Instagram, Pinterest, and Google+.

Note: HubSpot customers can also schedule content through Social Inbox, or use this spreadsheet to organize their content and subsequently upload it to Social Inbox. Detailed instructions for doing this exist in the cover sheet of the template.

How to Use the Social Media Calendar Template to Plan Your Content Schedule

When you open up the social media content calendar template, you'll notice the bottom of the Excel spreadsheet has several different tabs, most of which are dedicated to a specific social network.

social-media-calendar-excel-tabs.png

The reason you'll want a different worksheet for every social network is simply that every social network is a little bit different. You can't just craft one, single social media update and use it across LinkedIn, Facebook, Twitter, Instagram, Pinterest, and Google+. You can certainly promote the same piece of content across all six of those networks, but that doesn't mean you'll craft your update in the same way for every single one of them. (In fact, you may even want to add additional tabs if you're active on other networks, like Quora or YouTube.)

This following sub-sections will walk you through how to fill out each of the four tabs you see in this template -- the updates for Twitter, Facebook, LinkedIn, Instagram, Pinterest, and Google+. But before we get to that, let's just walk through the "Monthly Planning Calendar" so you know what that's for.

Monthly Social Media Schedule 

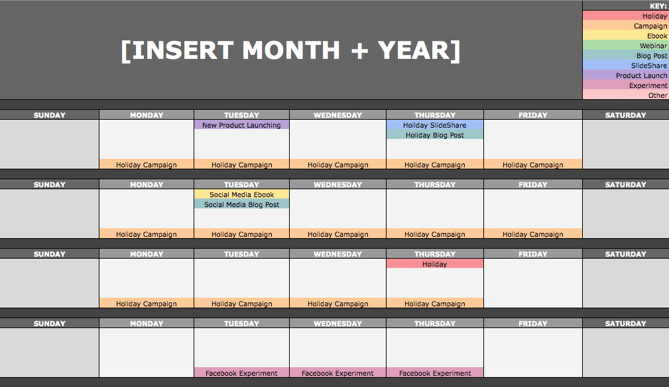
The tab "Monthly Planning Calendar" provides an overall snapshot of your monthly social media campaigns. It'll help you coordinate better with other stakeholders, not to mention keep all the moving parts straight in your own mind. Here's what it looks like:

social-media-calendar-month-view.png

There are three sections to take note of when you edit this template for your own purposes. First, the color-coding key: These are the types of content or campaigns around which you might coordinate, like ebooks, webinars, blog posts, product launches, and so on. Though only some of these might be relevant to you, they're there to indicate what you may want to put in there -- so be sure to edit these categories to align with your own campaigns.

The other two sections you'll need to edit are the Month and Year at the top of the calendar (duh), as well as the cells below each day of the week. In those cells, you should enter the type of content you'll be promoting that day and color-code it to align with the campaign it's supporting.

Instead of deleting all the content in this spreadsheet each month, I recommend copying this worksheet twelve times over, and creating a separate sheet for each month. (If that gets to be too overwhelming, you can always save those tabs as a separate file.)

Planning Your Twitter Content Calendar

Alright, now let's get to the social media content. This section will be the lengthiest, because all subsequent sections will draw on the instructions we go through here. So if you read one section in this whole post, make it this one.

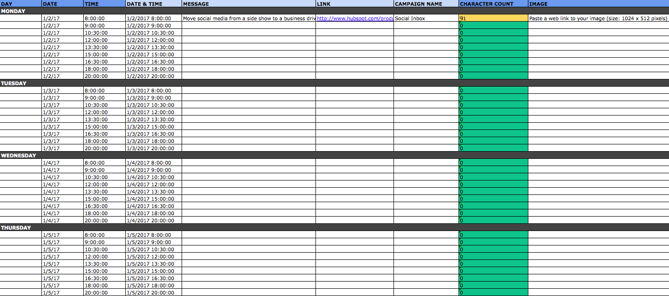
Let's say you want to add some tweets to your scheduling template. Skip over to the "Twitter Updates" tab, where you'll see this:

Social media calendar template for Twitter content

The first four columns, "Day," "Date," "Time," and "Date & Time" are there for your convenience, and if you choose to use a third-party app for pre-scheduling your tweets (like HubSpot's Social Inbox), then these columns will be useful. For now, just fill in the date on which you'd like your updates to publish to Twitter, and the time at which you'd like them to go out. The "Date & Time" column will automatically change based on what you input in the previous two columns.

Now, let's move over to the "Message" column. Here, input the copy you'd like to appear in your tweet, bearing in mind you should cap it at 116 characters to allow enough room for a link, and at 115 characters to allow room for an image. (Read this blog post for a full character count guide.) This spreadsheet will auto-calculate the number of characters you've entered to keep you on-point, turning yellow when you've reached 95 characters, and red when you've reached 116 characters.

After you've composed your tweet, paste the URL you'd like to include in your tweet in the "Link" column. Be sure to include UTM parameters so you'll know whether all of these tweets are actually driving traffic, leads, and customers. This is an important step to remember if you'd like to be able to demonstrate ROI from social. You can also use the "Campaign" column to add an associated campaign, which helps which more robust tracking and reporting.

Finally, in the "Image" column, attach the tweet's image (if you have one). For Twitter, we recommend images that are 1024 x 512 pixels. (Click here for a full cheat sheet of social media image sizes.) If you're having trouble attaching your image to the spreadsheet, follow these steps:

Step 1: Right-click the cell in which you'd like your image.

Step 2: Click "Hyperlink," then click the "Document" button, and finally, click "Select" to choose your image.

Step 3: In the "Choose a File" window, select the image from your computer and click "Open."

Step 4: You'll now see the image attached to the "Insert Hyperlink" screen. Feel free to edit the "Display" text to change the file name, then click "OK."

Note: This process is simply for organizational purposes. If you decide to upload the spreadsheet to your social media publishing software, it will not attach -- you'll have to do that with your marketing software. If you're a HubSpot customer, details for how to bulk upload your Twitter content to Social Inbox can be found within the downloaded template.

Planning Your Facebook Content Calendar

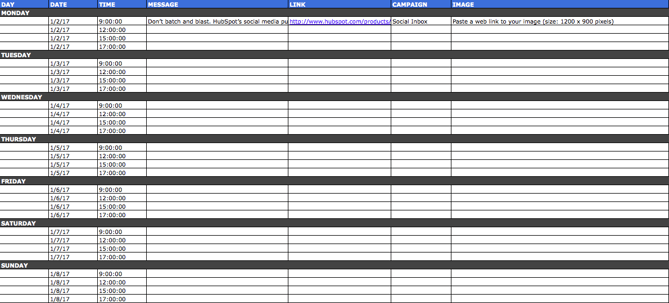
Now, let's talk about how to plan your Facebook marketing in advance with the template. Navigate on over to the tab in your template labeled "Facebook Updates."

Social media calendar template for Facebook content

Facebook updates work similarly to Twitter updates, with the exception being bulk uploading your content is not possible in Social Inbox.

The first three columns, "Day," "Date," and "Time" are there for your convenience. Head on over to the column labeled "Message" and input the copy you'd like to appear in your status update, corresponding to the days and times you'd like those updates to run. Then, move to the "Link" column and input the link you'll be, you know, linking to in the update. (Don't forget that tracking token.) If you'd like the update to be tagged to a certain campaign, include this in the "Campaigns" column. Finally, attach an image just like you did with your Twitter updates -- if you're using one, we suggest you edit it to be 1200 x 900 pixels. (Click here for a full cheat sheet of social media image sizes.)

Planning Your LinkedIn Content Calendar

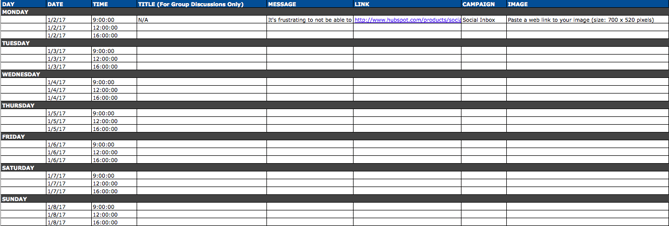
LinkedIn updates are the most unique, because you have both Company Pages and Groups to consider. To demonstrate the difference between Company Page updates and Group updates, let's navigate over to the column labeled "Title (For Group Discussions Only)."

Social media calendar template for LinkedIn content

LinkedIn Groups let you post a few kinds of updates, one of which is called a "Discussion." You will only fill out the "Title (For Group Discussions Only)" column if you're looking to post a Discussion to your LinkedIn Group -- because Discussions are the only update you'll be posting that requires a title. If you're not posting a Discussion to a LinkedIn Group, you don't need to fill out this field, because your update will not have a title.

You'll fill out the next column, "Message," for every type of update you post, whether it's for a Company Page or a Group. Simply input your copy into this column, and then navigate to the next two columns, "Link" and "Campaign" to input the URL to which you're directing readers with the tracking token you'll use to track activity, and the associated campaign if one exists. If you'd like to use an image for an update, attach it per the instructions laid out in the "Twitter" section. We recommend editing the image to 700 x 520 pixels.

Planning Your Instagram Posting Calendar

Now, let's move on to how to set up your Instagram photos and videos in advance with the template. Navigate on over to the tab in your template labeled "Instagram Updates."

Social media calendar template for Instagram content

Instagram updates work similarly to Facebook updates, in that content can't be uploaded in bulk to Social Inbox like it can with Twitter.

The first three columns, "Day," "Date," and "Time" are there for your convenience. Head on over to the column labeled "Message," and input the copy you'd like to appear in your post's caption, corresponding to the days and times you'd like those updates to run. Keep in mind that although Instagram captions can be up to 2,200 characters long, they cut off in users' feeds after three lines of text. The exact length of these three lines depends on the length of your Instagram handle. (Read this blog post for a full character count guide.)

Next, move to the "Link for Bio" column and input whichever link you plan to put in the bio when you publish the accompanying Instagram post. (The reason you'd put a link in your bio and not the photo caption itself is because clickable URLs aren't allowed anywhere except the single "website" box in your bio. See #13 in this blog post for more on how that works.) Oh, and don't forget that tracking token.

If you'd like the update to be tagged to a certain campaign, include this in the "Campaigns" column. Finally, attach an image just like you did with your other social media updates -- we suggest you edit it to be 1080 pixels x 1080 pixels. (Click here for a full cheat sheet of social media image sizes.)

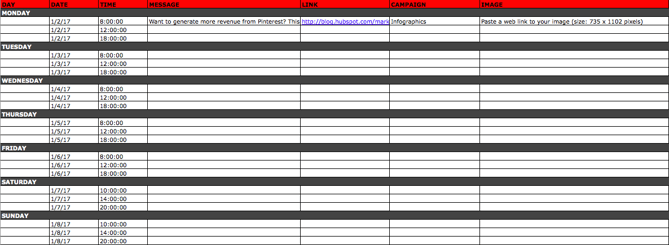
Planning Your Pinterest Content Calendar

Alright, now let's go over how to set up your Pinterest pins in advance with the template. Navigate on over to the tab in your template labeled "Pinterest Updates."

Social media calendar template for Pinterest content

Pinterest updates work similarly to Facebook and Instagram updates, in that content can't be uploaded in bulk to Social Inbox like it can with Twitter.

The first three columns, "Day," "Date," and "Time" are there for your convenience. Go to the column labeled "Message," and input the copy you'd like to appear in your pin's description, corresponding to the days and times you'd like those updates to run. Then, move to the "Link" column and input the link you'll be, you know, linking to in the update. (Don't forget that tracking token.)

If you'd like the update to be tagged to a certain campaign, include this in the "Campaigns" column. Finally, attach an image like you did with your other social media updates -- we suggest you edit it to be 735 pixels x 1102 pixels.

Planning Your Google+ Posting Calendar

Finally, we come to Google+.

Social media calendar template for Google+ content

Update: Google recently announced it is shutting down its Google+ platform. Please consider using the template and instructions below for any potential social networking platform Google launches in the future, and check back with us for an updated template that reflects this rollout.

Start in the "Message" column, and input your status update. Then move over to "Link" column, where you'll input the link to which you're directing readers. If you'd like the update to be tagged to a certain campaign, include this in the "Campaigns" column. If you're attaching an image, you could use multiple different sizes, but 960 pixels x 960 pixels works best. (Click here for a full cheat sheet of social media image sizes.)

Content Repository (Or, Where to Source Social Media Content)

This template also provides you with a tab called "Content Repository," which should help you keep track of all your content and maintain a healthy backlog of fodder to make sourcing social media content easier.

social-media-calendar-content-repository.png

As you create more assets, you'll likely want to resurface and re-promote those pieces down the line, too. To ensure you don't lose track of all of that content, record it on this tab so you're never at a loss for what to publish on social. If the content you're promoting isn't evergreen, be sure to include an expiration date in the column marked "Expiration" so you don't promote it when it's jumped the shark.

This tab will also help you maintain a healthy balance of content: A mix of your own content and others', a mix of content formats and types, and mix of lead generation content vs. MQL-generating content vs. traffic-friendly content.

Don't Forget to Interact With Your Followers

Whether you use this spreadsheet to plan your content out in advance or upload to a third-party app, you'll still need to supplement these updates with one the fly content. Breaking news hits? Whip up a quick update to share it with your network. Someone in your network tweets something interesting? Give it a retweet with some commentary. Got a fascinating comment on one of your updates? Respond with a "thank you" for their interaction or an additional follow-up comment.

Coming up with and scheduling your social media content in advance is a huge time-saver, but it should go without saying that you still need to monitor and add to your social presence throughout the day.

Finally, we encourage you to experiment with your social media publishing. This template provides publishing dates and times for each social network, but you may find those are way too many updates for you to fill, or perhaps too infrequent for your booming social presence. You should adjust your social media publishing frequency as needed.

Free Template Social Media Content Calendar

from Marketing https://blog.hubspot.com/blog/tabid/6307/bid/33415/the-social-media-publishing-schedule-every-marketer-needs-template.aspx