
If you fell behind on your spring cleaning this year, it's okay -- so did I. I haven't put away my winter coats, I haven't unpacked all of my moving boxes, and I haven't cleaned my computer's desktop lately.
You know what I'm talking about -- all those forgotten documents and miscellaneous screenshots that have been slowly taking over our screens for weeks -- and sometimes, even months.
Hoarding files on your desktop not only makes it challenging to locate what you need when you need it, but it can also compromise the speed of your computer. 
To help you keep your desktop tidy, we've come up with a few helpful tips. From creating a folder system, to trying out a new desktop design, these suggestions are designed to help you unbury yourself and stay productive in the process.
7 Computer Desktop Organizing Tips
1) Create a folder system.
Be honest: How many files do you have on your desktop right now? 10? 20? 100? Have you lost count? If your desktop looks anything like the image below, you may want to start by moving everything into one folder to clear the air.

To create a new folder on a Mac, right-click on your desktop and select New Folder from the menu. The folder will appear on your desktop instantly. To change the folder's name, double-click on "untitled folder," and you'll be able to edit a text box with a new name.
To create new folders in Windows, right-click on your desktop and select New > Folder from the menu. To rename the folder, click on it, enter a new name, and then press Enter.
Once you have your folders created, you can begin to divvy up your files. How you choose to organize your folder system will be dependent on your specific role. For example, I frequently write blog posts that contain a lot of visual examples. To simplify the process and keep a record of what I've included in the past, I've created two folders: Current Examples and Example Archive.

When I'm rounding up examples for a new post from the web, I drop them in the Current Examples folder. This way, I can easily locate them when I go to write the post. Once the post is prepped and scheduled, I move the images to the Example Archive folder to make room for my next post.
2) Choose a naming convention for your files.
One of my biggest worries when I implemented a folder system was that it would be too difficult to find my files once I got organized -- ironic, right?
But between documents, screenshots, and other files for the multiple blog posts I work on each week, there are a lot of different items I'm dropping into folders that can get lost in the shuffle. That's why I started using a naming convention to organize my files, so I could quickly find them once they were organized into folders.
Choose a naming convention for types of files, topics, projects, or any other way that makes it easy for you to search for them. For example, when I'm creating files for HubSpot Marketing Blog posts, I use this naming convention:
- MKTG-Draft-OrganizeDesktop
- MKTG-Screenshot-OrganizeDesktop
- MKTG-GIF-OrganizeDesktop
This way, it's easy for me to find files by typing Command + F (Mac) or Control + F (Windows) and typing in the naming convention to narrow your search:
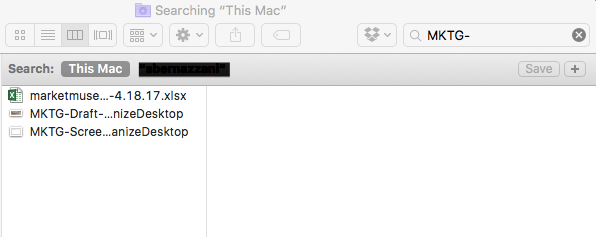
This way, I don't have to click into my perfectly organized, but likely very full, folders to find exactly what I need. Instead, I can simply search for and immediately find files by using my naming convention.
3) Experiment with a sectioned wallpaper.
Want to take your folder organization a step further?
While your desktop wallpaper is a great place for you to display a photo of your dog or latest vacation, there are also a ton of wallpaper options available that can actually help you stay organized. These wallpaper designs -- in combination with your folder system -- make it easy to corral specific sections of your work. (It's kind of like using iPhone folders ... but for your desktop.)
To get you started, we've included a few options to choose from below.

[Download here via Moritz Fine Designs]

[Download here via Lifehacker]

[Download here via Moritz Fine Designs]

[Download here via Lifehacker]
4) Use a Chrome extension to pre-organize your screenshots.
Screenshots are one of the biggest contributors to desktop clutter. When you capture a screenshot on a Mac (Command + Shift + 3) or PC (Alt + Print Screen), the image saves directly to your desktop. And if screenshotting is something you find yourself doing a lot, you'll notice that it doesn't take very long for it to make a mess of things.
To avoid having your screenshots automatically save to your desktop, you can use a screen capture tool such as the Awesome Screenshot extension for Google Chrome. Not only does this tool provide you with more advanced screen capture capabilities -- annotations, selective capture, delayed capture, etc. -- but it also aims to simplify the way you store your shots.
With Awesome Screenshot, you have the option to manually choose where you'd like to save your file, or you can create an account where you can save files to specific projects.
The latter will require you to sign up for a free account, but here's how it works:
- Capture an image by clicking the extension and selecting an option from the menu.

- Crop and annotate your screenshot as you see fit, and then hit Done.

- Select your desired option for saving from the menu on the right. If you'd like to save the image to a project's folder on Awesome Screenshot, select Save on Awesome Screenshot at the top.

- Insert a name for your file and identify which project you'd like to save it to by selecting an option from the menu. To save it, hit Upload.

- To access your file at any time, visit the appropriate project folder in your account dashboard.

- When you add screenshots to a project folder, you can then collaborate with other members of your team by sharing the folder, adding point-specific comments, further annotations, etc.

5) Get inspired by a motivational wallpaper.
Not a fan of the sectioned off wallpaper? No worries. There are other wallpaper options that can give you the motivation to stay organized.
According to psychologist and motivation expert Jonathan Fader, inspirational or motivational messages often serve as a powerful incentive for us to try harder. "There's a little bit of implicit coaching that's happening when you're reading it. It's building that self-efficacy in that kind of dialogue that you're having with yourself," he explains.
So if you're looking for a little coaching to help you stay organized, adding an inspirational message to your desktop can serve as a friendly, daily reminder.
Want to create your own motivational wallpaper? Follow the instructions below to learn how using Canva.
- Click on "Use custom dimensions" in the top right-hand corner and add your dimensions. Some of the most common desktop wallpaper resolutions are: 1024 x 768, 1280 x 1024, and 1920 x 1080.

- To add a background image, click on Elements > Photos. You can also choose a plain color or pattern background by selecting Background.

- Select a photo and adjust the size using the resizing points around it.

- To add text, click on Text and choose a heading or template from the options listed. Adjust the template text by adding your quote of choice. (I chose a quote from Barbara Hemphill on clutter.)

- To save your creation, click on the Download button in the top right-hand corner and select Image: high quality (PNG).

To set this image as your wallpaper on a Mac or Windows computer, refer to the following tutorials:
6) Invest in a storage solution.
If you're constantly dealing with managing and organizing a lot of files, you may want to invest in an application like Dropbox to better manage your assets.
Dropbox is a file hosting service that offers cloud storage and file synchronization. Users can create a folder on their computers that syncs with the service, making it easy to access the content no matter what device you're using. Rather than dragging everything onto your desktop, simply store it in Dropbox where you can quickly and easily search for it whenever you need it.
You can also share folders with other users to create a central space for all of your shared files. This helps to prevent any bottlenecking that might occur when others are forced to wait on you to locate a specific file.
Clean desktop. Organized files. It's a win-win for everyone.
7) Schedule a weekly or monthly cleaning.
As shown by the example we used back in the first tip, it's easy for your desktop to get kind of, well ... scary.
To ensure that you're keeping up with desktop maintenance on a regular basis, set a recurring event on your calendar to remind you to get rid of anything unnecessary. This can be a weekly or monthly event, depending on how much damage you typically do.

How do you organize your desktop for optimal productivity? Share with us in the comments below.
Editor's Note: This post was originally published in December 2015 and has been updated and for freshness, accuracy, and comprehensiveness.

from HubSpot Marketing Blog https://blog.hubspot.com/marketing/organize-computer-desktop-tips
No comments:
Post a Comment